| Key Takeaways |
|---|
| Unreal Engine Blueprints can be used to create interactive elements in game development. |
| Creating a Door Actor Blueprint involves setting up a Static Mesh Component for the door. |
| Utilizing a Timeline Blueprint can help set up proximity-based opening doors. |
| Placing the Actor into the Level and utilizing the Play in Editor (PIE) mode can help verify the functionality of the interactive door. |

Me after following a tutorial.
Introduction to Door Interaction in Unreal Engine
Interactive elements are essential in game development to create immersive experiences. One such element is door interaction. In this article, we will explore how to use Unreal Engine Blueprints to create player interaction for opening doors.
Overview of using Unreal Engine Blueprints to create player interaction for opening doors
Unreal Engine Blueprints are a visual scripting language that allows developers to create gameplay mechanics and interactive elements without writing code. Using Blueprints, developers can create complex interactions between objects in the game world.
Importance of interactive elements in game development for immersive experiences
Interactive elements are crucial in game development as they help create immersive experiences for players. As developers often say “Have something interesting for the player to do every 20 seconds” They allow players to interact with the game world and feel like they are part of it. Interactive elements such as doors, switches, and buttons can add depth to the game world and make it more engaging.
(Before you Begin)
There are two things you’ll most likely need if you’re following this blog post afresh, and that’s a read-only interact interface blueprint accompanied by the appropriate player character interactable blueprint, I’ll depict both of these below.
A basic read-only function that you don’t need to add anything to beyond creating the initial blueprint.

Player Character Interact Blueprints
Creating the Door Actor Blueprint
The first step in creating a Door Actor Blueprint is to create a new Blueprint project with Starter Content enabled. Once the project is created, add a new Blueprint Actor class named BP_DoorActor (or whatever you wish to call it!). Next, set up the Static Mesh Component for the door.
Step-by-step guide to creating a new Blueprint project with Starter Content enabled
- Create a new Blueprint project with Starter Content enabled (Right-Click on Content Browser).
- Add a new Blueprint Actor class named BP_DoorActor.
- Set up the Static Mesh Component for the door.
Instructions for adding a new Blueprint Actor class named BP_DoorActor and setting up the Static Mesh Component for the door
- Double-click the BP_DoorActor from the Content Browser to open it in the Blueprint Editor and open the Class Defaults.
- From the Components tab, click the Add Component button and select Static Mesh to add a new Static Mesh Component.
- Right-click your static mesh component and select Rename to rename it to DoorFrame.
- From the Components tab, click the Add Component button and select Static Mesh to add a new Static Mesh Component.
- Right-click your static mesh component and select Rename to rename it to Door.
- Click Add Component, select Box Collision from the dropdown menu, and rename it to Box (scale the box collision according to your object using the ‘R’ hotkey).

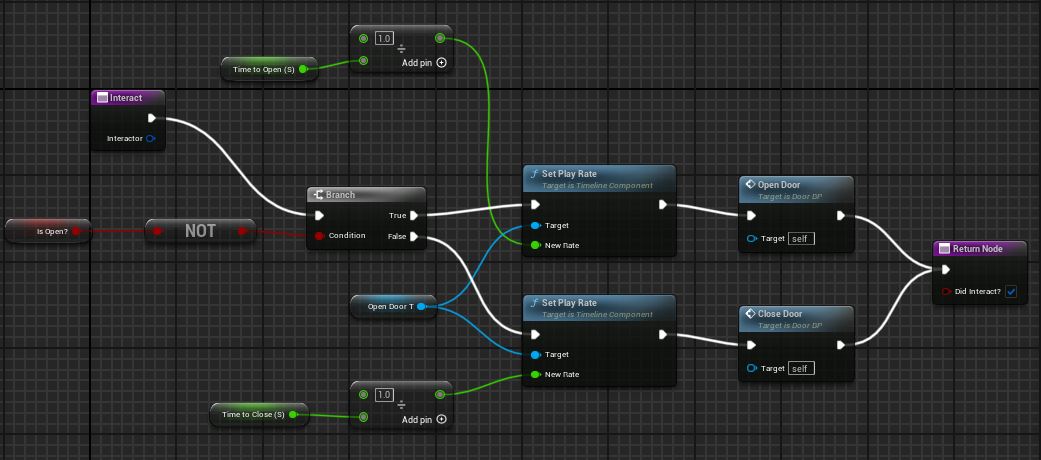
Add the Read-Only blueprint function via ‘Class Settings’ in your BP_DoorActor

After you’ve created your static mesh and box collision, you’re going to want to add these blueprints to the interact function you’ve added to the BP_DoorActor
Implementing Proximity-Based Door Interaction
To implement proximity-based door interaction, we can utilize a Timeline Blueprint. The Timeline Blueprint can help set up a proximity-based opening door using resources available in Unreal Engine.
Utilizing a Timeline Blueprint to set up a proximity-based opening door
- Open the Event Graph, right-click the graph, and choose Add Timeline from the Blueprint Context Menu.
- Name your Timeline DoorTimelineComponent.
- Double-click the DoorTimelineComponent in the Event Graph to open the Timeline Editor.
- Click Add Float Curve to add a new curve to the track and name the curve DoorRotationZ.
- Right-click to add two keys to your float curve track. One with the value (0,0) and another with the value (5,90).
- Shift select both your keys, right-click, and from the Key Interpolation dropdown menu select Auto interpolation.

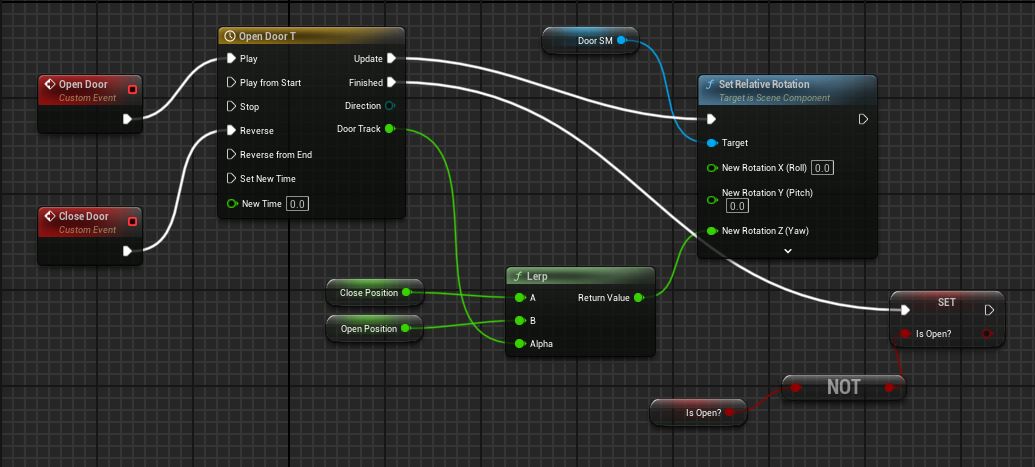
The Timeline Component will look like the above image when double-clicked, add your float tracks accordingly.

You may set up your BP_DoorActor like this in the ‘Event Graph’, ‘Close Position’ & ‘Open Position’ float variables refer to saved rotation values of how you want your object to move, you can experiment with that inside your viewport where you set up the static mesh.
Demonstrating the use of resources available in Unreal Engine to create interactive door behavior
Unreal Engine provides a wide range of resources to create interactive door behavior. By utilizing these resources, developers can create immersive experiences for players.
Placing the Actor into the Level
Once the BP_DoorActor is created, it can be placed into the level. This can be done by dragging and dropping the BP_DoorActor from the Content Browser into the level.
Instructions for placing the BP_DoorActor into the level and testing the interactive door behavior
- Drag and drop the BP_DoorActor from the Content Browser into the level.
- Utilize the Play in Editor (PIE) mode to verify the functionality of the interactive door.
Additional Resources and Tutorials
For further exploration of door interaction and Blueprint implementation, here are some links to video tutorials and community discussions:
Follow this video guide for a full interpretation of what is discussed in this blog post, it’s well worth the time to understand how it all works!


